If you've ever dabbled in 3D printing-whether as a hobbyist, a manufacturer, or someone just curious about how parts get made-you've probably heard the term "infill density" tossed around. It's the stuff that determines how solid your printed part is, right? You might need a lightweight model for a prototype, a strong functional part for a machine, or something in between. As a supplier of MJP 3D printers, I get this question all the time: Can our MJP 3D printers print models with different types of infill densities? The short answer is a resounding yes-but there's way more to it than just flipping a setting in your slicer. Let's break this down, since I work with these machines every day and help folks figure out exactly what they can (and can't) pull off.
First, let's start with a quick refresher on what MJP even is, for anyone who might be new to the space. MJP stands for Multi-Jet Modeling, a 3D printing tech that works by jetting tiny droplets of photopolymer resin onto a build plate, then curing them with UV light layer by layer. Unlike FDM printers (the ones most people have on their desks, which melt plastic filament), MJP uses liquid resin, so it can get way finer details, smoother surfaces, and way more consistent parts. That consistency is key when it comes to infill-because infill is the internal structure that gives a part its strength, weight, and rigidity.
Now, infill density is basically the percentage of a part's internal volume that's filled with material, ranging from 0% (hollow) to 100% (solid). But it's not just a single number-there are different infill patterns too, like grid, triangular, honeycomb, and even custom ones. The big win with MJP here is that our machines aren't locked into one infill setting per entire model. Wait, let me make that clear: you can print a single part with different infill densities in different sections. For example, if you're making a bracket that needs to hold 50lbs, the part that attaches to the wall can be 70% infill for strength, while the arm of the bracket that just connects to a small component can be 20% infill to save material and cut print time. How? Because MJP's slicing software lets you assign infill settings to specific regions of a model, not the whole thing. That's a game-changer for folks who don't want to waste material on parts that don't need to be rock-solid.


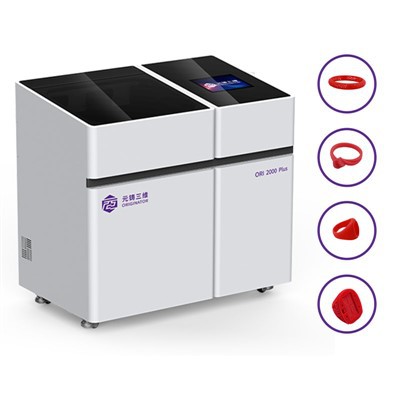
Let's talk about why this matters for different use cases, too. If you're in jewelry production, for example, you might need a wax model that's solid enough to handle the investment casting process but light enough to reduce burn-out time. Our MJP 3D printers for jewelry production are designed to handle exactly this-you can print a wax ring with 100% infill on the band (where strength matters for handling) and 30% infill on the decorative top (which doesn't need to be thick). That saves on wax material, which is a big deal if you're making dozens of pieces a day. A lot of our jewelry clients swear by this because it cuts their production costs without sacrificing the final piece's quality. If you're into lost wax casting or investment casting, this flexibility is even more critical-those processes rely on the wax model burning out cleanly, so a custom infill density can actually make the burn-out faster and less likely to leave residue. I should link you to our Lost Wax Casting MJP 3D Printer page if you want to dive deeper into how this works for casting applications-we've got a bunch of case studies there.
Another area where variable infill shines: functional industrial parts. If you're using an MJP industrial 3D printer for making jigs, fixtures, or even end-use parts, you can tailor infill to the load each section will carry. Say you're making a fixture for holding a car part during machining: the part that clamps down needs to be stiff (so 60% infill), but the handle that you grip only needs to be 25% infill to keep it lightweight. That not only makes the fixture easier to use but also cuts the print time from 4 hours to 2, which is a huge win for a production line. Unlike some other printers that struggle with inconsistent infill across a single part, MJP's jetting tech is precise enough to switch infill densities without leaving gaps or weak spots. I've seen clients go from printing every part with 100% infill (which is slow and expensive) to variable infill and cut their material costs by 30-40% in some cases. That's not a number I pulled out of thin air-those are real stats from customers who switched to our machines.
Wait, but can you mix infill densities and infill patterns? Yeah, actually. Let's say you have a model where a section needs to be super strong, so you use a triangular infill (which is better for compression) at 80%, and another section that needs to be flexible, so you use a grid infill at 15%. MJP's software lets you do that too, because it's not just a single infill pattern for the whole part. A lot of people don't realize that variable infill isn't just about density-it's about customizing the internal structure to match the part's purpose. For example, if you're making a prosthetic socket liner, you might use a honeycomb infill at 40% in areas that need cushioning and a solid infill at 100% where the socket attaches to the limb. That's a specific use case, but it shows how flexible MJP is when it comes to meeting unique needs.
Now, let's get real about the limits. I don't want to overpromise-our MJP machines can't do everything, but when it comes to infill, they're pretty versatile. The lowest infill you can reliably print is around 10%-any lower than that, and the internal structure might be too weak or have gaps that cause the part to break. The highest is 100%, obviously, but even that can be useful if you need a solid part that's still smoother than what you can get with FDM. Also, the size of your infill lines (the tiny strands that make up the internal structure) depends on the machine's resolution. Our MJP industrial printers have a 300 DPI resolution, so the infill lines are super consistent, which means even variable infill looks the same across a part-no lumpy spots or uneven density. Some cheaper MJP copycats (not ours, obviously) have lower resolution, so they might struggle with fine infill details, but our machines are built for precision.
Another thing to consider: material choice. MJP works with a bunch of different photopolymers, like standard rigid resins, flexible resins, and even wax resins for casting. The infill density will behave differently depending on the material. For example, a flexible resin with 20% infill will be way more bendy than a rigid resin with 20% infill, so you have to pair infill settings with the right material. If you're printing jewelry wax models, our Jewelry Wax Model MJP 3D Printer uses a specific wax resin that works perfectly with variable infill-no issues during casting, even when you have different densities in one piece. That's why we recommend checking the material specs before you set your infill, but our team can help with that if you're not sure.
Let's also talk about practical examples from our customers, because that's the stuff that matters. A few months back, a small aerospace component maker came to us saying their FDM printer was too slow and wasteful for their bracket parts. They were printing every bracket with 100% infill, which took 6 hours per part and used $15 worth of plastic each. We had them test our MJP industrial printer with variable infill: 70% on the load-bearing sections, 25% on the rest. The print time dropped to 2.5 hours, material cost per part went down to $4, and the parts passed all their strength tests. They switched their entire production line to our machines after that. That's exactly the kind of result variable infill delivers-efficiency, cost savings, and quality.
Another example: a custom jewelry maker who was hand-carving every wax model for their pieces. Hand-carving takes weeks, and they often made mistakes in the internal structure that led to broken castings. They got our MJP 3D printer for jewelry production, and now they print each wax model with variable infill: solid on the prongs (where strength is key for holding a gemstone) and 30% on the setting (to cut down on wax and make burn-out faster). They now have 24/7 production, no broken castings from bad wax infill, and they're able to take custom orders in a fraction of the time. That's the power of being able to adjust infill for specific parts of a model.
Wait, some people might ask: why not just print a hollow part if you don't need internal strength? Because hollow parts can be tricky-if you leave a part completely hollow, you might get warping during curing, or the internal surfaces might have imperfections that show up in the final part. Infill gives you structure without the full cost of a solid part. It's a middle ground that MJP excels at, because the jetting process lets it place material exactly where you need it, instead of just filling space.
Let's also clear up a common misconception: variable infill doesn't mean you have to be a 3D printing expert to use it. Our slicing software has pre-set templates for different use cases-like "high strength," "lightweight prototype," or "jewelry wax"-and you can tweak the infill densities for each section with a few clicks. We also provide tutorials for new users, so you don't have to figure it out on your own. If you're used to FDM printers, variable infill with MJP is way simpler because the software does the heavy lifting, and the consistent print quality means you don't have to adjust for layer height or filament flow.
So circling back to the original question: Can an MJP 3D printer print models with different types of infill densities? Absolutely. It's one of the biggest advantages of MJP tech over other 3D printing methods, because of the precision, control, and versatility. Whether you're making industrial parts, jewelry, or casting models, being able to tailor infill to different sections of a part saves time, cuts costs, and improves the final product. If you're in the lost wax or investment casting space, our Investment Casting MJP 3D Printer is built specifically to handle these variable infill wax models, so you don't have to worry about issues during the casting process.
If you're thinking about making the switch to an MJP 3D printer to take advantage of variable infill, or you just have more questions about how it works for your specific use case, feel free to reach out to our team. We're not just a supplier-we work with customers every day to figure out the best settings, materials, and workflows for their projects. Whether you're a small jewelry shop, an industrial manufacturer, or a hobbyist looking to level up your printing, we can help you get the most out of your MJP printer.
References
- Multi-Jet Modeling Technology: A Guide for Industrial Applications, Additive Manufacturing Journal, 2023
- Infill Density Optimization for 3D-Printed Functional Parts, Journal of Manufacturing Processes, 2022
- Lost Wax Casting with 3D Printed Models: Best Practices, Casting Industry Quarterly, 2024
- Precision 3D Printing for Jewelry Production: Trends and Techniques, Jewelry Manufacturing Review, 2023
- Variable Infill Strategies for Reducing Material Waste in Additive Manufacturing, Sustainable Manufacturing Journal, 2022